Output Settings
JPEG = All plansPNG/WEBP & PDF = ProTrim & Watermark = UnlimitedWhat you'll learn
- Image format (JPEG = All plans / PNG & WEBP = Pro)
- Auto-trim (Unlimited): safe margin and max trim per side
- How direct PDF output and PDF splitting work
1Where to find Output settings
All settings for how captured images are saved and processed are in the Output tab under Settings → Capture Settings. The three areas are: Image Format, Auto-trim, and PDF splitting. Watermark settings are configured separately under Settings → Watermark Settings.
2Image Format
Choose the file format in which captured images are saved.
| Format | Description | Plan |
|---|---|---|
| JPEG | Small file sizes; the standard choice for photos and book pages. | All plans |
| PNG | Lossless format. Text and lines stay crisp; files are larger. | Pro and above |
| WEBP | High compression with excellent image quality. | Pro and above |
Delete temporary files after processing
When Delete temporary files after processing is enabled, the original captured image files are automatically deleted once packaging into PDF or ePub is complete. This is useful when you only want to keep the final output. Leave it off if you also want to keep the individual source images.
3Auto-trim Unlimited
Auto-trim automatically removes unwanted margins around captured images, so even if the capture area includes a little extra space, your output stays consistent.
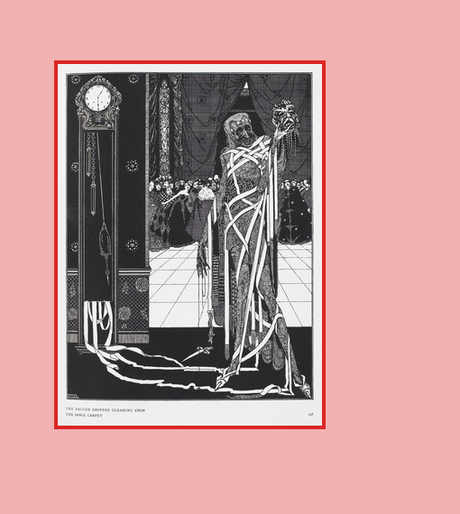

Illustration is in the public domain (Harry Clarke, 1919), used here to demonstrate how extra margin can appear around captured content.
- Enable — Turn Auto-trim on or off.
- Sides to trim — Choose which sides (top, bottom, left, right) to trim.
- Safe margin — Amount of margin (px) to preserve around the content so it is not over-cropped.
- Max trim per side — Maximum number of pixels that can be trimmed from any single side. If the actual margin exceeds this limit, trimming stops at the limit and some margin remains. Increase this value if you want to trim more (default is 50 px, which may be conservative for large images).
Safe margin: the margin kept around the content (the green line is the trim boundary). A smaller value crops closer to the content; a larger value leaves more space.
Max trim per side: if the margin exceeds this value, each side is trimmed only up to this limit and the rest remains. Increase the value to trim more (default 50 px).
4Save as PDF & PDF splitting Pro and above
You can save captured images directly into a single PDF. This is a mode that builds a PDF on the fly during capture.
- Save as PDF — Each captured page is written directly into one PDF as it is captured (direct PDF output mode). In this mode, individual image files are not saved — only the PDF is kept.
- PDF split size (MB) — When the PDF reaches this size, a new file is started (capture_part01.pdf, capture_part02.pdf, …). Set to 0 to disable splitting and produce a single file (capture.pdf).
5Watermark Unlimited
Watermark settings are found under Settings → Watermark Settings. With the Unlimited plan, you can add your own text watermark to output files. You can customize the text as well as its position, color, angle, opacity, and outline.